Sewing More Complex Paper Pieced Patterns
Introducing “The Little Gnomeling”, the companion piece for The Fancy Mushroom.

Isn’t she cute?
This is the perfect next step into a little more complex paper pieced block.
Click here to download your Gnomeling Pattern.
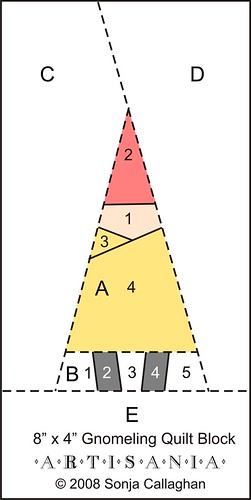
Cut along the dotted lines to make 5 separate pieces. Be sure to print the extra copies, so you can keep your pattern pieces pinned to the fabric so everything stays organized. Remember to cut your fabric with the right side down.
Start with pattern piece A, and begin as you did with the mushroom, tacking down piece #1.
Here are a couple of shots of the bottom piece going on:


Note: The bottom piece will be off at an odd angle when you’re ready to sew. If you take your time to cut out the pattern pieces from the pattern, (be sure to add 1/4″ seam allowance to each piece) then you shouldn’t have any trouble lining up your seams so that the piece lays properly after you press it into place. In the next tutorial I’ll be sharing my own personal technique for ensuring my seams are lined up nicely.
Piece A completed. Note how the corners are pinned to the pattern to keep things nicely aligned for the next step:

It really helps to have perfect 1/4″ seam allowances on all your pieces.
Complete pattern piece B and pin it to A, right sides together…paper to the outside:


Take your time to carefully line up the corners at either end:

TIP: This is the WRONG WAY to insert your pins. Going straight at the fabric like this will cause the piece in behind to scooch down as you then move the pin to insert it:

This is the RIGHT WAY to insert the pins. Come in from the top at an angle. This way everything stays nicely aligned:

Sew pieces A and B together, and then flip to iron the seam. This is the RIGHT WAY to iron. Start at the base fabric, and then come sideways to press the seam all in the same direction. Flip and repeat on the front side:


Adding piece C:

Once you’ve sewn on C, D and E, this is what you’ve got:
A finished Little Gnomeling:

Let’s add a border to the top, bottom and left side of our mushroom – 2 and 1/2″ wide strips ought to do:


Trim your edges nice and straight, then add the gnomeling:
Cute eh?
Once you’ve got her figured out, why don’t you try the next pattern below?
Introducing “Gnomlette”. (Gnomelings big sister)

Here is your pattern:
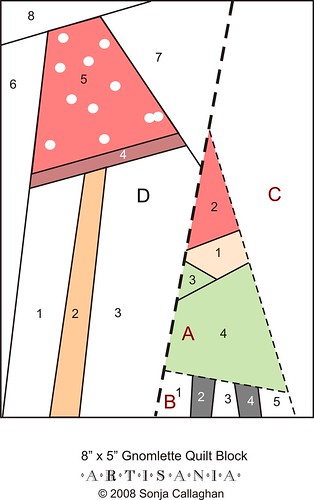
Click here to download your Gnomelette Pattern.
Have fun, and please let me know if you make one!
Trackbacks
- Gnomlette’s debut. « Artisania
- Remember Gnomeling, Gnomlette’s baby sister? « Artisania
- Paper Piecing: Step By Step « sewhooked blog
- Gnomlette Mini Quilt « Not Nigella
- Craft Blog » Blog Archive » Adventures In Paper Piecing
- Another Gnomlette sighting! « Artisania
- If Only I Had Gnome! « Allz I'm sewing is…
- Foundation Paper Piecing, Step-by-Step | Lightblue Quilt Co.


Hello Sonja,
Thank you for dropping by and visiting my blog!
I LOVE your blog. The paper-pieced blocks you have done are amazing. I have to admit I had played with paper-piecing, but have never made anything substantial out of it. You have inspired me to give it another try! 🙂
I so totally love this! Thank you for sharing the pattern!
\
it is fantastic
Thank you SO much for this pattern, this was the first ever paper pieced pattern I’ve tried and I’m officially in love 😀
My finished version is here!
6iLnfT Thanks for good post
These are so cute, I just saw the link to your blog from flickr, will have to have a look 🙂
This is a great little tutorial. I tried it out today (my first paper piecing) and they turned out so cute! If you want to see how it went you can see them on flickr or my blog.
Thanks!!
Hi Sonya – i love your gnomeling! I’ve just modified one to make Santa for my Christmas wall hanging. Thanks for sharing you sweet designs!
These are awesome. Can’t wait to try them!
Hi Sonja,
I was wondering if you’re maidan name is Kim, You have two brothers, Jason and Micheal and a mom named Heide and a Dad Named Ty(I think). If so, you and I went to high school together at Bby South. I have always wondered how you were doing. It would be great to hear from you. Claire
Claire I’ve emailed you!!!
Sonja,
I’m not sure why, but when I pieced mine, it came out reversed. WHat the heck am I doing wrong? It was the gnomlette pattern. The mushroom leaned the opposite way..UGGGG! Can you help me?
Hey Lynn, you’re not doing anything wrong! The finished block is always the reverse of a paper pieced pattern. You could always trace the lines on the backside of the pattern and then your gnome and shroom would lean the other way.
I said it elsewhere, in your pages, but I have to say it again: I love these so much.. This will be the first time I try the paper pieces technique, thanks to you!